Monday 31 August 2015

Three Lions on my Dirt

Three Lions (yawn)
OK, so it was another poor title and one of them is actually a lioness, but I have managed to finish off another three 'big cats' (with emphasis on big) in the last week, save for their bases and varnishing. Again they're the soft polyethylene type that I'd purchased in a Poundlandworld though you only get a single usable Lion in any particular pack.
Side view (who'd have guessed ?)
These do take my acrylic paints rather well and with these three I didn't undercoat them with black primer as I did with the original Italeri one. Instead I used a sand colour as the base over which I mainly applied washes and highlights of colour, with some detailing.


Blurry snap
Even with my lack of painting skills I reckon you can still make out what they're meant to be!
"By  Jupiter he's a biggun"
I should really reiterate that these models are pretty good detail wise but they are really big, well over-scale for 54mm figures; I quite like that whilst I'm sure many will not.


Comparative View (the Italeri one is small, not just far away)
They're not the biggest lions you get in the £1 bag either!


The photograph on the right shows the largest lion I have, which along with all the other ludicrously large animals went to the grand-children's collection. In the centre is the one I think the most usable and consequently the one I used, whilst on the right is the abandoned, unfinished Italeri one which looks quite wimpish in comparison.
At home with the noisy upstairs neighbours


Here's another comparison montage of before and after, just to show that even for toys they come up to a fairly acceptable  wargaming standard.


Close up of face (obviously)


As with so many bloggers, I do know that trying to stick to a deadline of blogging is quite an incentive to get some progress in a project even if it's just a little every week. I've three more left cats to finish, but I have a lot more animals!

That's it then for another week with the usual hope that anyone reading this will find something of interest.


Monday 24 August 2015

What's new Pussycat ?

Did you guess that they're meant to be tigers ?
This is a first for this blog, being something recently painted! I've haven't managed any figure painting since being ill in March but that has now been remedied with a couple more animals for my gladiators to combat .
They're a couple more of the soft plastic squeaky toy types, similar to the two bears I posted about last week, so of course they suffer from all the same problems and faults that the bears had.
There is a lot of flash on these models (some of which I missed, but meh, they're merely playing pieces and I'm not attempting to win any prizes with them!) and they have a horrible join around their waist which had to be cut off, filled  and disguised as fur.
Should have a black pupil of course
For all their faults though, they're recognisable as what they're meant to be and the detail isn't that bad either - for a very cheap toy (50p), as can be hopefully be seen in the photograph on the left, despite my painting skills (or lack thereof) - if I'd had a steadier hand I'd have added a black pupil.
For the purists however there is one inescapable fault with these models in that they're rather over-sized, being at least one and a half times as large as they should be. for my purposes though it does mean that they look better on the larger base size. I reckon that if they were in scale they'd fit onto a single hex.
"Ubi irrumabo quod non venis?"
When put against a 54mm gladiator, they're a veritable monster of a beast!
I've left the bases of all the animals in a raw state, to be finished at the same time for consistency.
To get an idea of just how large these beast are, the photograph on the left shows one of these large lions (in its straight-out-the-bag state) shown alongside the lion that comes with the Italeri set of Gladiators.
Below is a couple of photographs showing how they match up to a 54mm gladiator, clearly showing the well-scaled Italeri version compared to the rather over-scaled "Bag-O'Animals" version (with newly added base)
Gladiator v the Italeri Lion
Gladiator v the "Bag-0'Animals Lion
It's obvious to me that the cheaper model is vastly over-sized - I've visited our local museum to see their life-sized, fully grown stuffed one but the cheap toys ones do stand out!
Lion menage a trois
In my collection of the cheap big cats I have two lions, a lioness, a cheetah and a leopard plus another cat that came from a tabletop sale.
Definitely at least one  cheetah (on the left)


Shown on the right, a cheetah and two leopards or maybe a leopard and two cheetahs, very tricky to say, but I reckon there's definitely one cheetah.


If my current painting spree continues, then next week I may well be posting more 'new' stuff, failing which I'll be digging into the archives to fit the bill of "Here's one I did earlier" but in the meantime, here's a quick welcome to my latest follower and to all those reading this, I hope you're finding something of interest.

You may also find something of interest on my other blog too, which you can find HERE

Monday 17 August 2015

The Bear Necessities (Animals 1)

The Italeri bears looking like a comedy act
Anyone who has the slightest bit of knowledge of the gladiator genre will know that animals were used for what passed as sport, but mainly consisted of slaughtering thousands of animals in a very one-sided fight. Every imaginable animal, of the ancient era would be used, some of which posed little to no threat to their antagonists. For my fights I thought I would stick mainly with the well known big cats, wolves, bears and maybe a few others.
In the Italeri Gladiators pack you get a pair of bears and  a pair of lions.
Flannigan and Allan ?
The bears are depicted on their hind legs which although a great pose, it's not completely compatible with the rules I intend to use, as bears are normally on all fours and have the ability to rear up on their hind legs. I could of course just use a counter to show what pose the bear was in but that somehow defeats the point of using models.
Two x fours
Finding suitable 54mm scale animals is by no means easy, unless you're willing to fork out some ridiculous prices for the old Britain's zoo figures and there are also a few manufacturers that do them in metal at comparative prices. So being the skinflint that I am I looked around for some suitable alternatives, coming up with some £1 bags of animals from the likes of Poundlandworld. Each bag of six or more animals at best had maybe two usable animals, which still worked out at 50p an animal (a bargain in my eye). There are many other such bargain buys around and it pays to have a firm idea in your mind of the size  you want your animals.
I was lucky enough to find a suitable bag that contained a single bear on all fours and bought two of them of course.
Two legs good, four legs better.
They're a little larger than the Italeri bears but fit in well enough for my purposes. As can be seen in the photographs the large animals (lions, tigers, bears etc.) are mounted on a double sized base (30mm x 80mm)  as they're meant to occupy two hexes. Smaller animals (wolves, dogs, boars, lynx etc.) have the normal single hex-sized base - I use 30mm x 40mm. 
The photograph clearly shows the smaller head/face on the Italeri model and to distinguish my two bears and their counterparts I painted one pair in a very dark brown and the other i a less dark brown, this can be clearly seen in the photograph above (I hope).
Two hex range good
So how do they compare with my 54mm figures, well the photograph on the right shows the Italeri bear against one of my 54mm gladiators for comparison purposes. You'll notice that the gladiators base colour doesn't match the arena's as the arena 'sand' colour hadn't been decided when my gladiators were painted and when I realised this future painted bases were put on hold until the arena base was finished.


Oh stercore!
Looking a bit more imposing, in my view is the bear on all fours shown on the other photograph.
A final word about these bags of plastic animals (I did buy quite a few) is that they really are garbage ! All are made in a soft plastic, that wouldn't be out of place if used as a squeaky toy for a dog and they also have other issues ! The bear for example has a distinctive 'join'  around its mid-rif as well as the normal flash I associate with cheap toys. I've cut the flash from the model, smoothed out the join and then re-cut the bear's fur patten into the model before painting (they took paint well) and I'm more than pleased with the final effect.

With a quick welcome to my latest follower, thanks for taking the time to look and that's it then for this week. 

Monday 10 August 2015

Painted Arena

So, my arena is all but finished, save for one two areas that have to be touched up.
As can be seen fro the photographs I did decide to go with colouring-in the inside walls, as if they had been plastered and painted, rather than just leaving them as 'stone'.
  I quite like the overall effect, it does brighten the whole thing up and there is some (though very little) archaeological evidence that the walls of the many arenas may have been painted.
I went with with the most prevalent colours that I could find, that are in evidence. Namely a rosy-pastel red, yellow ochre, white and black. I could just as easily have plumped for a pastel blue too as that is in much evidence on buildings too.
The six columns and arch feature has had  the 'flaming' bowls removed from the Playmobil model and the top filled with foamboard and filler. I also added a small dais to the central platform, again out of foamboard, whilst the two plinths on either side of the columns have been 'capped off' with some plastic card to hide the hole that was left from the removal of the Playmobil figure that was meant to stand there.
One of the two 'side' plinths
Photo showing the beading and baseboard
The whole model sits on 5mm foam, which in turn is glued to the very solid base-board of ply.
I surrounded the foam with some 6mm quarter-round beading to protect it, consequently leaving a 1mm edge showing. To compensate for this I've filled the entire outside area of the arena with cheap Poindlandworld ready-mix filler, (including the areas under the arches, but not the 'animal pens').
The photograph on the right shows (poorly) the transition from the main arena entrance to the 'outside' and just how tight the model is to the edges of the foam baseboard. It also just about shows the nicely rounded edge to the baseboard proper, (thanks go to #2 son and his router for that addition).
The baseboard had been given a quick gloss spray undercoat in the initial stages of this build, but I gave it another much needed coat using Humbrol gloss black enamel to clearly define it. Various brown etc. were used for the outside of the arena as the base colour, but these all need a lighter highlight rather than be left as the muddy morass it appears at the moment. There are also one or two other areas that need touching up paint-wise, but nothing too dramatic; the arena 'as-is' is ready to from my point of view!
Statue and 'drape'
There are a couple of features though that I've been wondering about (remember that dais?).
The first feature is a statue, which I was always going to include ands what the dais was originally intended for. I picked up a very suitable plastic model from ebay (use the search Safari Rome in Toys and Games to find similar items).  I think it looks OK, but for the fact that its coloured! Whilst I believe the Romans (and other civilised peoples at the time) used to colour their statues, we're so used to seeing them as bare stone that I should re-paint it as such; currently I'm undecided.
The second feature which I'm considering adding to the model is the addition of some 'banners' for want of a better word, draped over the balustrade of the podium. This would be a simple addition, using some embroidery ribbon material supplied to the cause by my daughter and  cut to length. As the ribbon is gold and purple I thought it very fitting and would add yet another bit of colour to an otherwise fairly drab feature of the model.
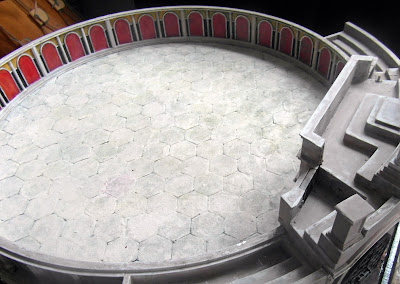
 Finally here a rather blurry photograph of the whole thing from above intended to show that it just fits on my 3 foot square dining table, without the leaves extended,  but the leaves will be used for all the figures, dice-rolling  paperwork etc.
 As the base-board is so substantial I've also thought of mounting it on its own removable legs, maybe at coffee-table sort of height, but those thoughts are currently merely that - thoughts.
In the meantime I do have some stick-on table protectors to affix to the baseboard.

If you're following this project I do hope finding something of interest from it, but that's all for this week.


Monday 3 August 2015

Arena Floor

Hex sheet cut to the size of the arena
My arena floor (the paying area ) was going to be hex based, so the first step to making this was considering the various ways that this could be achieved. Rather than cut-out hexes and glue them in place or buy commercially available ones I opted to carve my own into the foamboard that the arena would be sitting on. The hex size  I opted for has a 30mm side (my figures sit on 30mm x 40mm bases and fit in comfortably).
I also had to considered the orientation of the hexes .
I used eight sheets of pre-printed A3 hex sheets (gleaned from BoardGame Geek an re-sized) and glued them together into a large sheet.
The arena was then centred on the combined hex-sheets and a rough outline was then made of it so I could trim all the excess hexes from it. I didn't want to cut out more hexes than I really needed for the combats and so the area that would be outside the arena wouldn't have hexes.
The hex paper was roughly 'tacked' to the foamboard base (one and a half sheets of A1) using some pva and the real work began.
Starting in the centre hex I worked my way to the outside of the floor,  a circle of hexes at a time.
It took forever, mainly because I didn't want to make a mess of it and I could only work on it in burst of about 40 minutes at a time (back and other problems).
I did the corners of each hex, in each of three directions, before connecting them with a cut along the edges, which I could do four at a time using a ruler.
The photograph on the right clearly shows the indentations made at the vertices of the hexes and some of the later cuts.
Some of the cuts made with the craft knife were very shallow as I didn't want to cut through the foamboard base. Those that I thought were too shallow I went over with a pointed stylus-type too, which opened up those hex sides that weren't defined enough.
Arena, now with added hexes!
Although laborious (probably taking more than four hours overall), the result was very acceptable.
The hexes were by no means perfect
 but they are distinct enough and accurate enough there's no confusion over them.
The Debris
The remains of the paper 'circle'  of unused hex pieces was gently peeled from the foamboard and along with all the cut out hexes,  binned.
After gluing down the foamboard as centrally as possible onto my base board, the next step was to undercoat the hexes with matt black spray (Poundlandworld special).
They were then coated liberally with slightly thinned pva and sprinkled with a sand (again a very thin layer).
The foamboard also had some 6mm beading glued to its edges for strength and finish.
This resulted in a 1mm lip around the whole board to which filler was applied.
Unfortunately I didn't manage to take any photographs of these latter stages of the build.

And that's it for this week and if you're following this blog then thank you and I hope you're taking something from it.